YubiKey Setup Gone Wrong on Mac?

A new YubiKey is definitely a few inches of curiosity packed in a tiny case.

However, things can go wrong and it happened with me too while I was following the steps provided in the below mentioned link:
I am using macOS Catalina and was able to observe that things worked well till the guide asks for testing the configuration. I was able to perform all these sections of the guide successfully:
- Installation
- Configuring your YubiKeys
- Associating your YubiKeys with your account
- Testing the configuration
As soon as I performed the steps given in the section ‘Enabling The Configuration’ and I tried login to my MacBook, I realized that all the following possibilities did not worked for me:
- Plugging out YubiKey, Plugging it back in, entering password, touching YubiKey.
- Keeping the YubiKey plugged in, entering a correct password, touching YubiKey.
- Only Touching the YubiKey and not providing any password.
- Long touch YubiKey in all above cases.
At the end, I realized I was stuck at this screen forever:

I tried to reset the password using Apple’s in-built feature, the password was reset successfully, but I guess YubiKey bypasses that as well. I read reviews of lot of people on google stuck at the same situation, but couldn’t find any definite solution.
I realized that the issue was caused by only one line which I inserted to the /etc/pam.d/authorization file, which now looked something like this:

However, I didn’t had access to this file as I was locked out.
Well, how to get a terminal now ????
I realized the only place where I could get access to the terminal now was the recovery mode terminal. (I have used it a lot earlier during unusual behavior of Mac during installation, “?” mark issues where Mac is not able to detect your filesystem (Faced a lot with my old Mac Mini). I went ahead using the recovery mode. To all those who are not aware about this:
Step 1: Shutdown your Mac.
Step 2: Turn On the Mac, and as soon as it makes the startup sound, hold the Command button and ‘R’ together.
After performing few other steps like choosing the WiFi connection, I was directed to this page. Under the Utilities menu, I found the Terminal option.

I was now having the access to the terminal but I tried to search for the file /etc/pam.d/authorization and I was not able to find it. I tried looking into the folder /Volumes/ and couldn’t find my Mac OS X folder tree structure there.
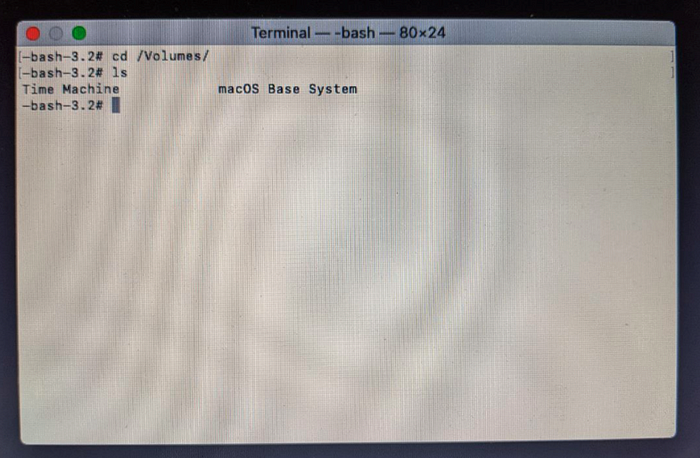
The only folder structure I could see there was the Mac OS X Base System and Time Machine. I googled, googled and googled, and found that Mac OS X file system could be enabled from the Disk Utility option.

As a next step, I clicked on the ‘Mac OS X’ selection on the left and clicked on ‘Mount’.

I exited the Disk Utility after the Macintosh OS X appeared to be mounted.
I again navigated to the ‘Terminal’ under ‘Utilities’ and searched for the ‘Mac OS X’ file structure under ‘Volumes’ and was able to find it now! Hurray !!!

After some searches, I was able to locate the /etc/pam.d/authorization file under the directory:
/Volumes/Mac OS X/System/Library/Templates/Data/private/etc/pam.d

Next step could have just been to edit the file and save it, but i realized that I was not having the proper write permissions to do it.
How to get proper permission on the file now?
I ran chmod 777 authorization and it worked !!!
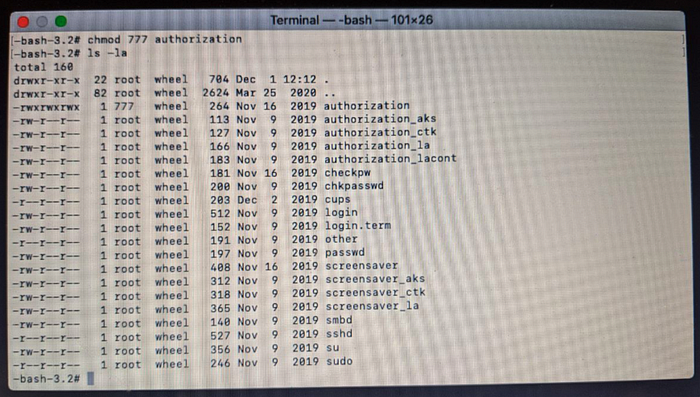
I was able to do ls -la now and can observe that I was having enough privileges to edit the file.
But .. But .. But .. The story was not over yet, I realized that many vi editor flags for editing were not working such as the ‘Delete/Backspace’ buttons from keyboard !!! This was how it was designed to work and configured by Apple. I was not even able to find nano editor as it kept saying command not found. I again tried to editing the file and was happy to know that ‘dd’ command worked and I was successfully able to remove the following line from the authorization file:
auth required /usr/local/lib/security/pam_yubico.so mode=challenge-response
I saved the file, exited the terminal, exited recovery mode and tried login again, and was successfully able to login to my machine !!!
